Scrunchies are small, useful, and incredibly cute. This is why they make for a great crochet project for beginners. They’re simple to crochet, don’t require too many materials or space, and are over in the blink of an eye. Even if you’re a total newbie, you can crochet a scrunchie in no time. Here’s how to get started.
This pattern does not contain complicated patterns or confusing terms. It is a short and clear guide that will lead you step by step through the process of making your first scrunchie and hopefully some more after that.
Why Scrunchies Are Perfect for Beginners
If you are new to crochet, large projects may make you run for the hills. But scrunchies are the opposite of intimidating, finished in only minutes! In this tutorial, we will crochet a simple scrunchie using a versatile crochet stitch pattern, and wrap it up in a chic, modern bow.
These are quick to knit, easy to fix mistakes and don’t require perfect stitches. By the time you finish, the texture of the hat will have hidden any stitches that aren’t quite up to scratch.
Another thing is that you can complete one in under an hour, which is a great confidence booster when starting out.
What You’ll Need
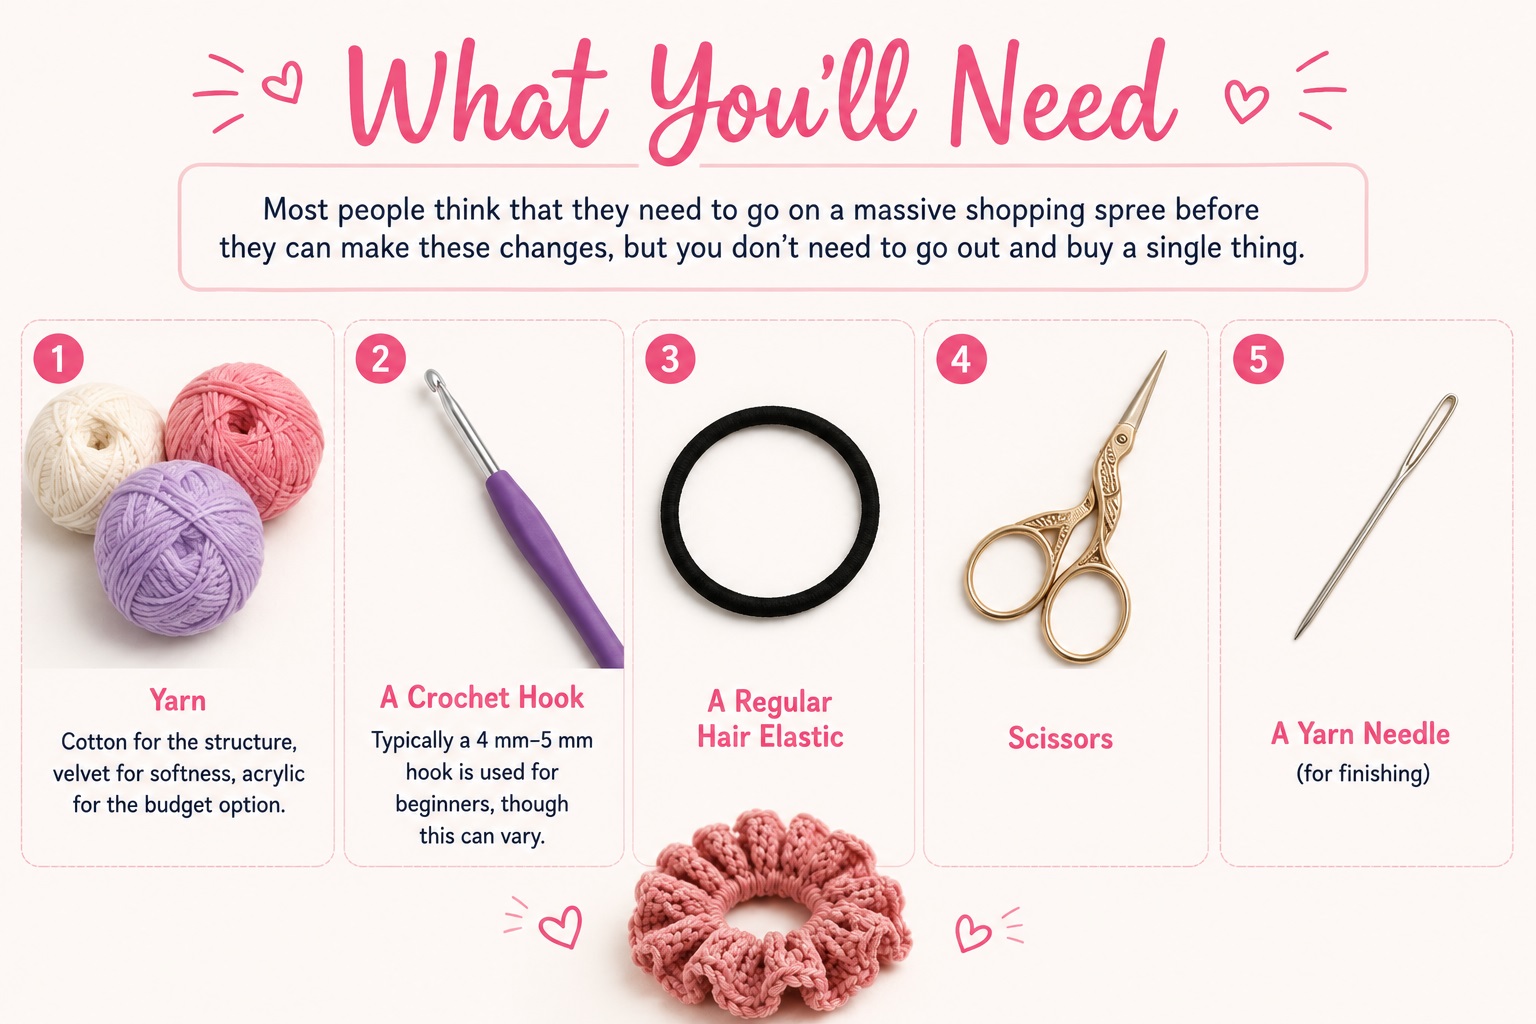
Most people think that they need to go on a massive shopping spree before they can make these changes, but you don’t need to go out and buy a single thing.
- Yarn (cotton for the structure, velvet for softness, acrylic for the budget option).
- A crochet hook; typically a 4 mm–5 mm hook is used for beginners, though this can vary.
- A regular hair elastic
- Scissors
- A yarn needle (for finishing)
Medium thickness yarn is easiest to work with, you can see stitches best with that. If you are undecided choose a medium weight yarn.
17 Easy DIY Home Decor Craft Projects
Stitches You Should Know First
You don’t have to be an expert. You simply need to know a few basic things.
- Chain (ch)
- Single crochet (sc)
- Double crochet (dc)
Those pesky 6 movements – if you can do even a couple of them, you’re good to roll.
Step-by-Step: How To Crochet A Scrunchie
Let’s actually make one.
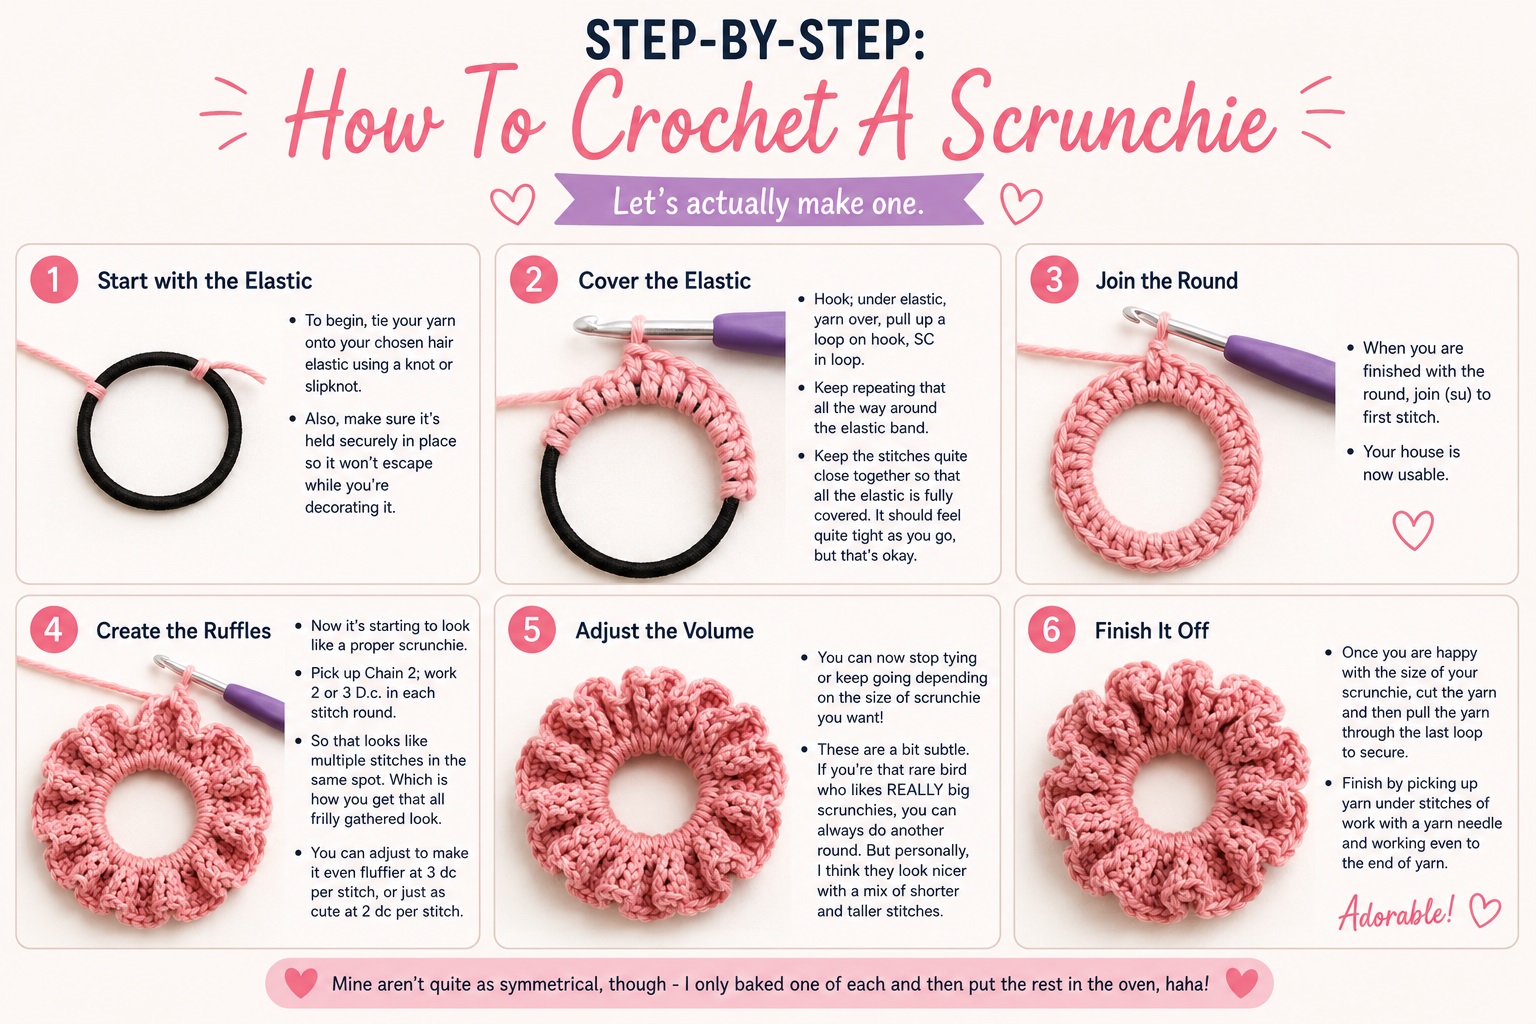
Step 1: Start with the Elastic
To begin, tie your yarn onto your chosen hair elastic using a knot or slipknot.
Also, make sure it’s held securely in place so it won’t escape while you’re decorating it.
Step 2: Cover the Elastic
Hook; under elastic, yarn over, pull up a loop on hook, SC in loop.
Keep repeating that all the way around the elastic band.
Keep the stitches quite close together so that all the elastic is fully covered. It should feel quite tight as you go, but that’s okay.
Step 3: Join the Round
When you are finished with the round, join (su) to first stitch.
Your house is now usable.
Step 4: Create the Ruffles
Now it’s starting to look like a proper scrunchie.
Pick up Chain 2; work 2 or 3 D.c. in each stitch round.
So that looks like multiple stitches in the same spot. Which is how you get that all frilly gathered look.
You can adjust to make it even fluffier at 3 dc per stitch, or just as cute at 2 dc per stitch.
Step 5: Adjust the Volume
You can now stop tying or keep going depending on the size of scrunchie you want!
These are a bit subtle. If you’re that rare bird who likes REALLY big scrunchies, you can always do another round. But personally, I think they look nicer with a mix of shorter and taller stitches.
There is no specified requirement as to the precise relationship or proportion thereof, and the final choice is a matter of personal preference.
Step 6: Finish It Off
Once you are happy with the size of your pom pom, cut the yarn and then pull the yarn through the last loop to secure.
Finish by picking up yarn under stitches of work with a yarn needle and working even to the end of yarn.
Adorable! Mine aren’t quite as symmetrical, though – I only baked one of each and then put the rest in the oven, haha!
8 DIY Projects You Can Do On A Budget
Tips That Make a Big Difference
After making a few you’ll get the hang of it and start to know what variations work better. Here are a few helpful tips upfront.
- Keep tension to even up the stitching.
- I would suggest using a more durable yarn for this scrunchie, as it will be worn daily! However, for the first, I used some softer yarn.
- Don’t overstuff the base round. It will become stiff.
- Experiment with different hooks to get the right texture.
A little finishing touch to my sewing adventures, an easy to make scrunchie, with a few tweaks here and there.
Easy Variations to Try
Once you’ve made a basic scrunchie, it’s hard not to experiment.
This pattern can be made with different types of yarn. Velvet yarn makes it look super cute and almost store-bought. Cotton yarn gives it a more clean and structured look.
You can also use these beads to add some colour to your life by using solid beads, patterned beads or even beads with leftover yarn.
These are pretty easy to make and very comfortable, I would recommend adding picot edges or lace detailing to give them a bit more oomph if you are confident enough to do so, but to be honest even the most basic ones look pretty good.
Common Beginner Mistakes
These first attempts will not be beautiful, but that’s okay!
I noticed that I needed a bit more stitches in the second round. If you don’t have enough, the scrunchie comes out flat instead of ruffled. And I had to redo mine because I had some big gaps in the first round. You should try to keep it even so you don’t see the elastic through the fabric.
Another pitfall for beginner crocheters is pulling the yarn too tight or too loose. This can be avoided by trying to crochet relaxed.
17 Cozy DIY Projects to Keep You Warm This Winter
How Long Will It Take?
I found my first scrunchie to take somewhere around the region of an hour to complete! Probably this will be a bit faster for people who sew more often.
It does take a few attempts to get the hang of making one, but soon you’ll be whizzing them out in no time – within 20 to 30 minutes, if that.
Can You Turn This Into a Side Hustle?
You actually can.
Scrunchies are easy to make in bulk and are always a favorite for people to buy as handmade accessories. They look neat and respectable to potential online customers and are easy to sell in local gift shops as long as they are finished properly, have nice color combination choices and feel soft to the touch.
It won’t make you instant riches but it is a good starting point for crochet sales.
Final Thoughts
One pattern that looks deceptively simple to learn how to crochet is the scrunchie. Learning how to crochet a scrunchie is one of those small skills that feel BIGGER than they actually are because even though it is ridiculously easy to learn and make (and very relaxing), you get to actually wear what you made!
This pattern gives croppers confidence too. Once they get to grips with this type of crochet, they’ll soon find that a bigger crochet project won’t seem as daunting.
The first one may not turn out so wonderfully but like I said, it’s the start of a yarn addiction. Just go with it!
